Introduction to SSH
Secure Shell (SSH) is a networking protocol that lets us securely access a remote computer over an insecure network such as the public internet. It is an application layer protocol in the Open Systems Interconnection (OSI) network model. SSH supports password and key-based authentication. Password-based authentication allows a user to provide a username and password to authenticate to the remote server. Key-based authentication lets a user use a pair of cryptographically secure keys for authenticating a client to a secure shell server. The Secure Shell protocol encrypts the data communication between the client and server, protecting the communication stream from unauthorised access by hackers. Without the username/password or keys, the data sent using an SSH-secured link cannot be intercepted.
The SSH Protocol is a server-client model. A server administrator installs an SSH-Server that accepts or rejects incoming client communications requests. In this case, our local computer will be the client, while Github's servers will be the server. SSH protocol defines port 22 as the default port the server listens on.
We shall consider key authentication in this guide, as it is the standard practice and allows us to connect to GitHub without entering a username and password every time.
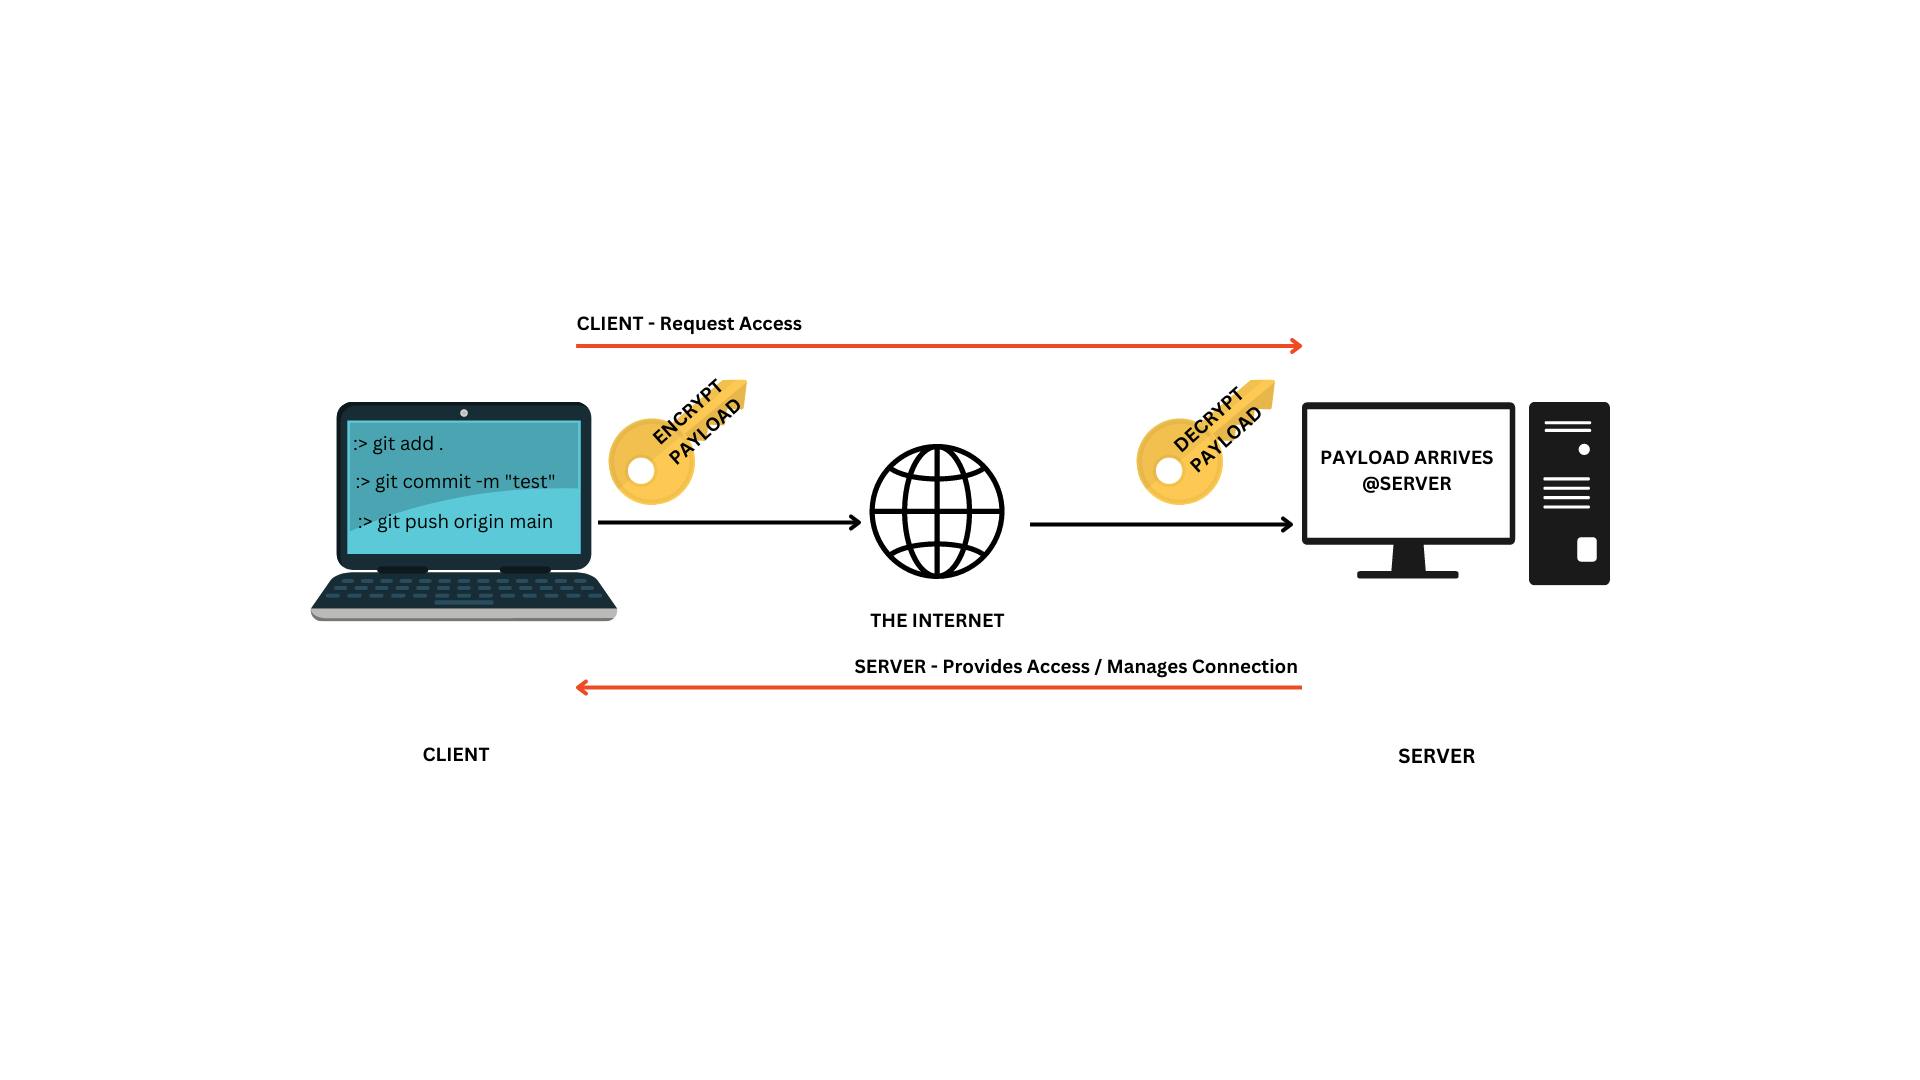
The image above explains how the SSH protocol provides secure connections (tunnels) from the client to the server using the public internet. This is a simplified view; you can read more about SSH online if interested. The encryption and decryption happen in reverse order when the server sends a payload to the client. In the scenario explored above:
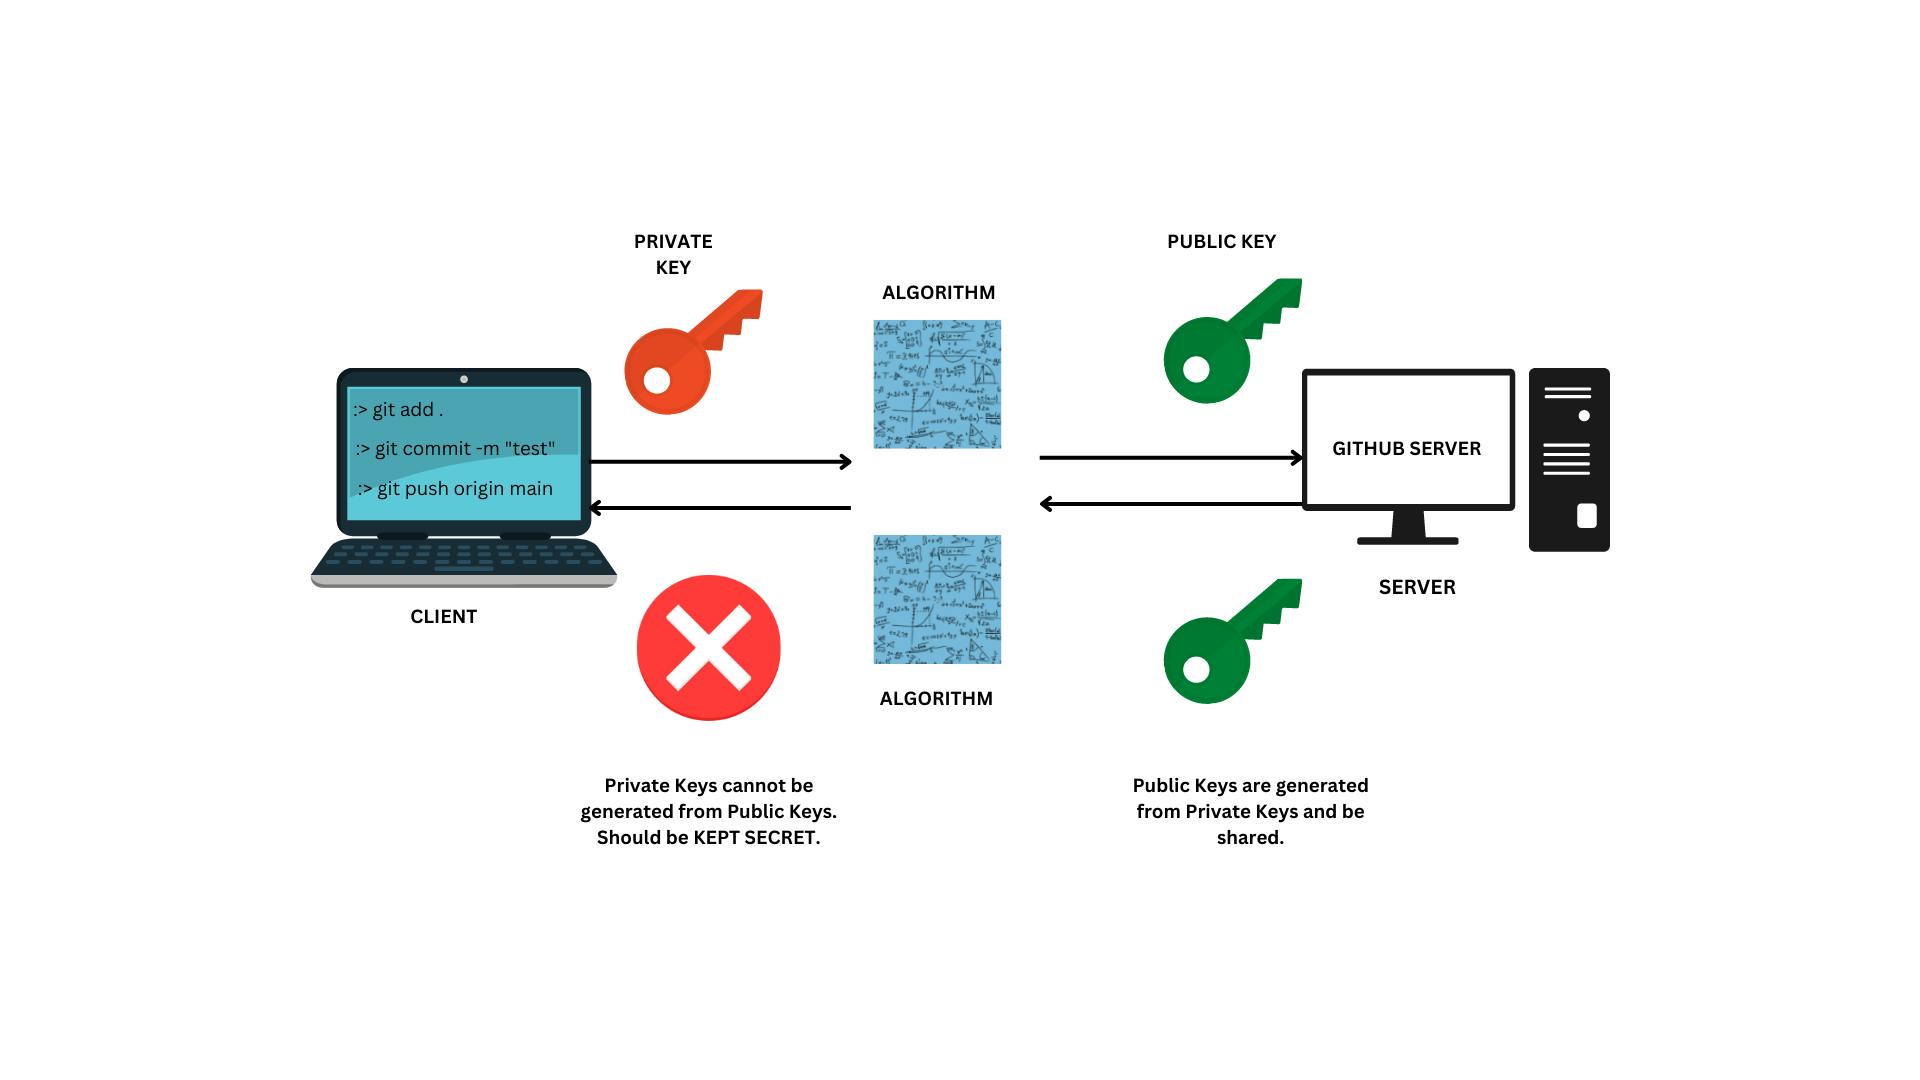
A user creates a pair of SSH keys: A private and a public key.
The user then copies the public key to the server - with the authorisation to do so from the server administrator or by self-authentic on the server.
SSH can then use these two keys to authenticate the client to the server, create a secure connection, encrypt the payload to be sent, decrypts it at the destination and tear down the link once completed.
Configuring SSH on Client Computer
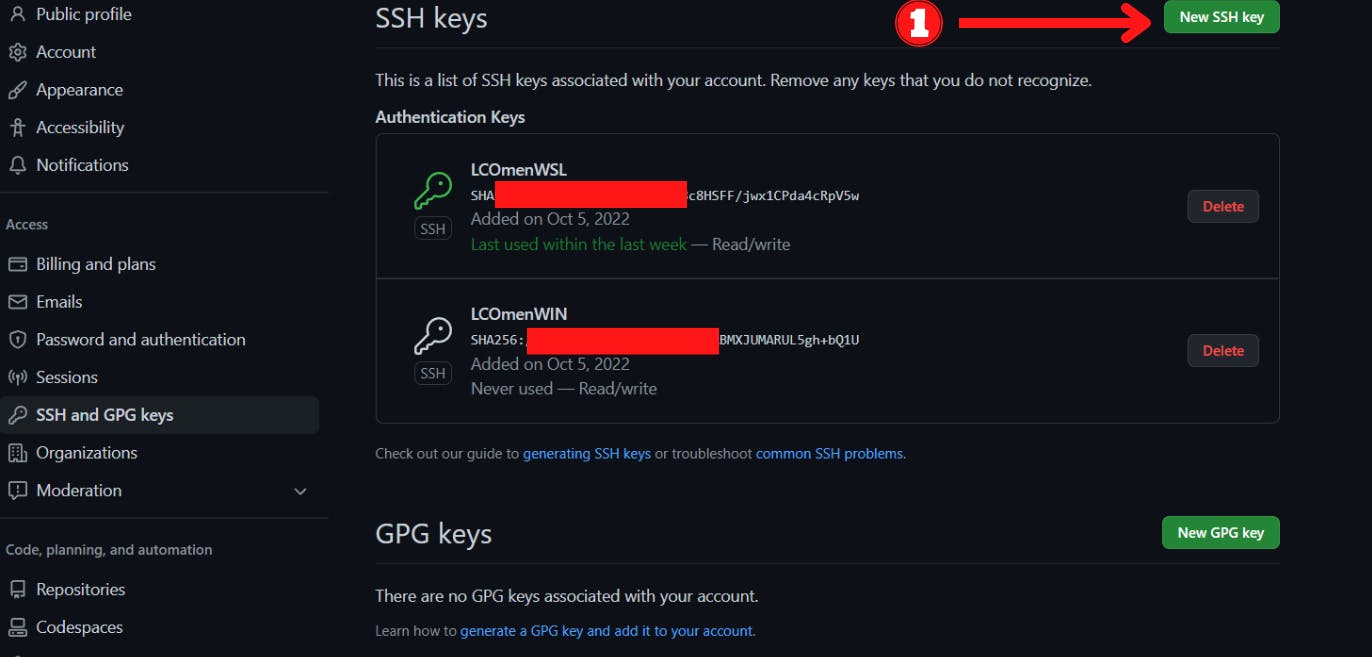
- Log in to your GitHub account, click on your profile picture, select "Settings", then click on SSH and GPG Keys. The steps are shown below as 1, 2 and 3.

In my case, I have SSH keys already configured on Github for my WSL and Windows Machines. In your case, you should not have any key configured. Keep this window and open your terminal or Git Bash if you are using windows. Git Bash is a small terminal installed when you install Git for Windows.
Check for existing SSH keys using the following command:
:> ls -al ~/.ssh

In the image above, the command lists my existing SSH keys. In the new Ubuntu terminal, I have not configured any key, while on the right Git Bash terminal, I have a pair of keys: id_ed25519 (private key) and id_ed25519.pub (public key). An additional file, known_hosts, keeps a record of hosts (computers) that have already been authenticated.
- Let us proceed to create SSH keys for the Ubuntu installation. The command to generate the ssh keys is as follows:
ssh-keygen -t ed25519 -C "test@example.com"
ed25519 is the encryption method preferred by Github. Stick to that.
Remember to enter your email instead of test@example.com
SSH will respond by asking you to select the directory to store your SSH keys. Keep the suggested guide by pressing ENTER.
You will have the option of entering a password to enhance the security of your keys. Remember - Anyone with access to your computer can use these keys to communicate with your Github Server. A password will give you an added layer of security. Enter a password and confirm it.
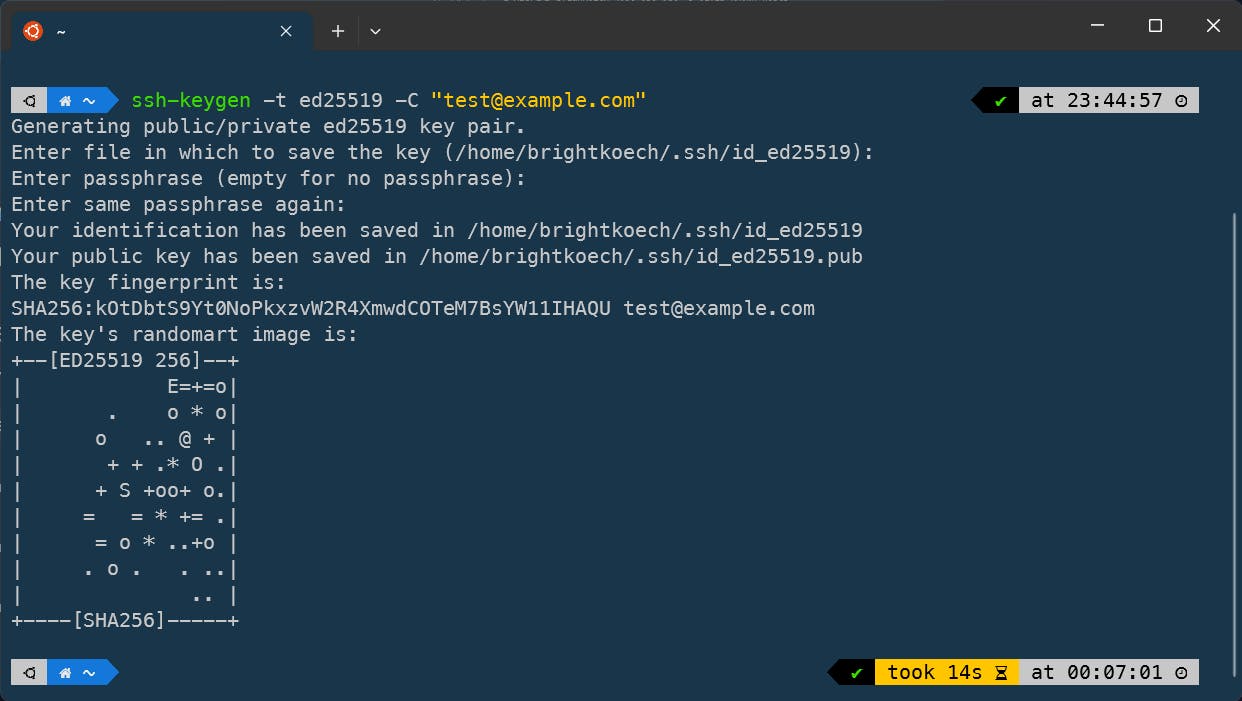
We have successfully created an SSH key pair. We can confirm this by running the following command:
ls -al ~/.ssh
Adding the SSH keys to SSH Agent
The ssh-agent is the SSH's key manager. We add our newly generated keys to the ssh-agent so that we don't have to enter the password every time we run ssh. We need to do it once after we restart the computer.
Run ssh-agent in the foreground using the following command:
eval "$(ssh-agent -s)"Add the ssh keys to the ssh-agent - Authenticate with the password you created when generating the keys, and you will see a confirmation that the identity has been added.
ssh-add ~/.ssh/id_ed25519

Copying the public key to the Github server
After completing the creation of the two keys and adding them to the ssh-agent, we will copy the public key to our GitHub server. You can either open the ~/.ssh folder and copy the contents of the id_ed25519.pub file directly or use an excellent application called xclip. I prefer the second method.
- Install xclip using the following commands
sudo apt update && sudo apt install xclip
- Use xclip to copy the id_ed25519.pub file as follows.
xclip ~/.ssh/id_ed25519.pub
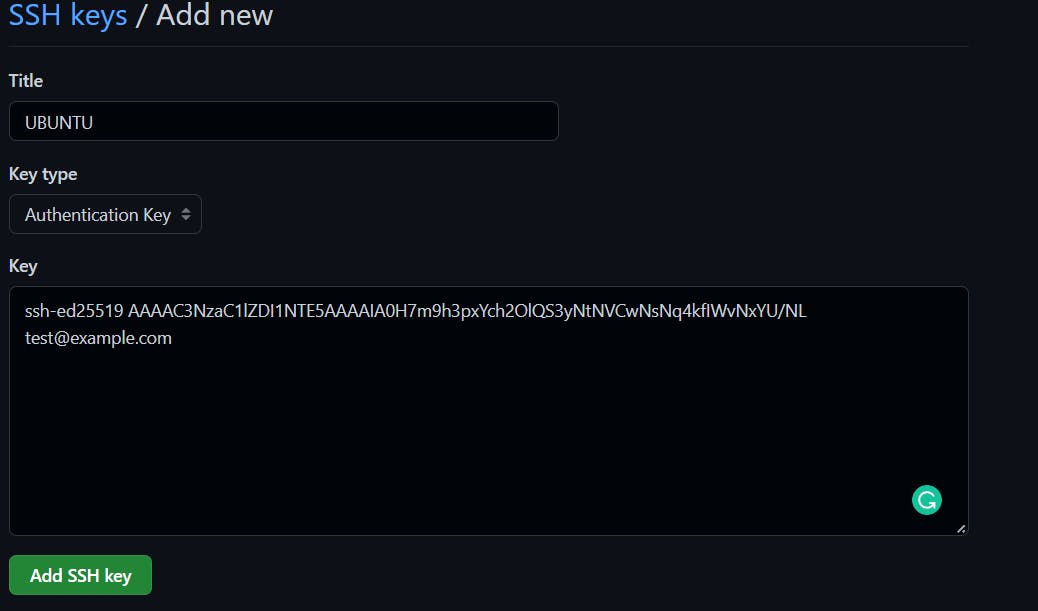
Go to the GitHub page we left open, click on NEW KEY, enter a TITLE for your key and paste the contents into the space provided, as shown in the screenshots below. Click on Add SSH key, then authenticate using your GitHub password.
Testing SSH Connectivity.
We have completed the process! To test whether we were successful. Run the following command:
sss -T git@github.com

Voila, we are successfully authenticated and now SSH while communicating between our computer and GitHub's servers.
Thank you for reading and until next time, keep coding!
